Sunday, 30 April 2017

At long last...


There's a reason why I call this blog Slow Threads, and this project reflects that.

I started working on this piece in January 2014. It began with a challenge from a friend after we'd visited an exhibit at a local gallery showing the work of 10 textile artists.  The challenge was to take three elements from the show and create an original piece.  And to keep it interesting, we each chose an additional element for the other to incorporate.
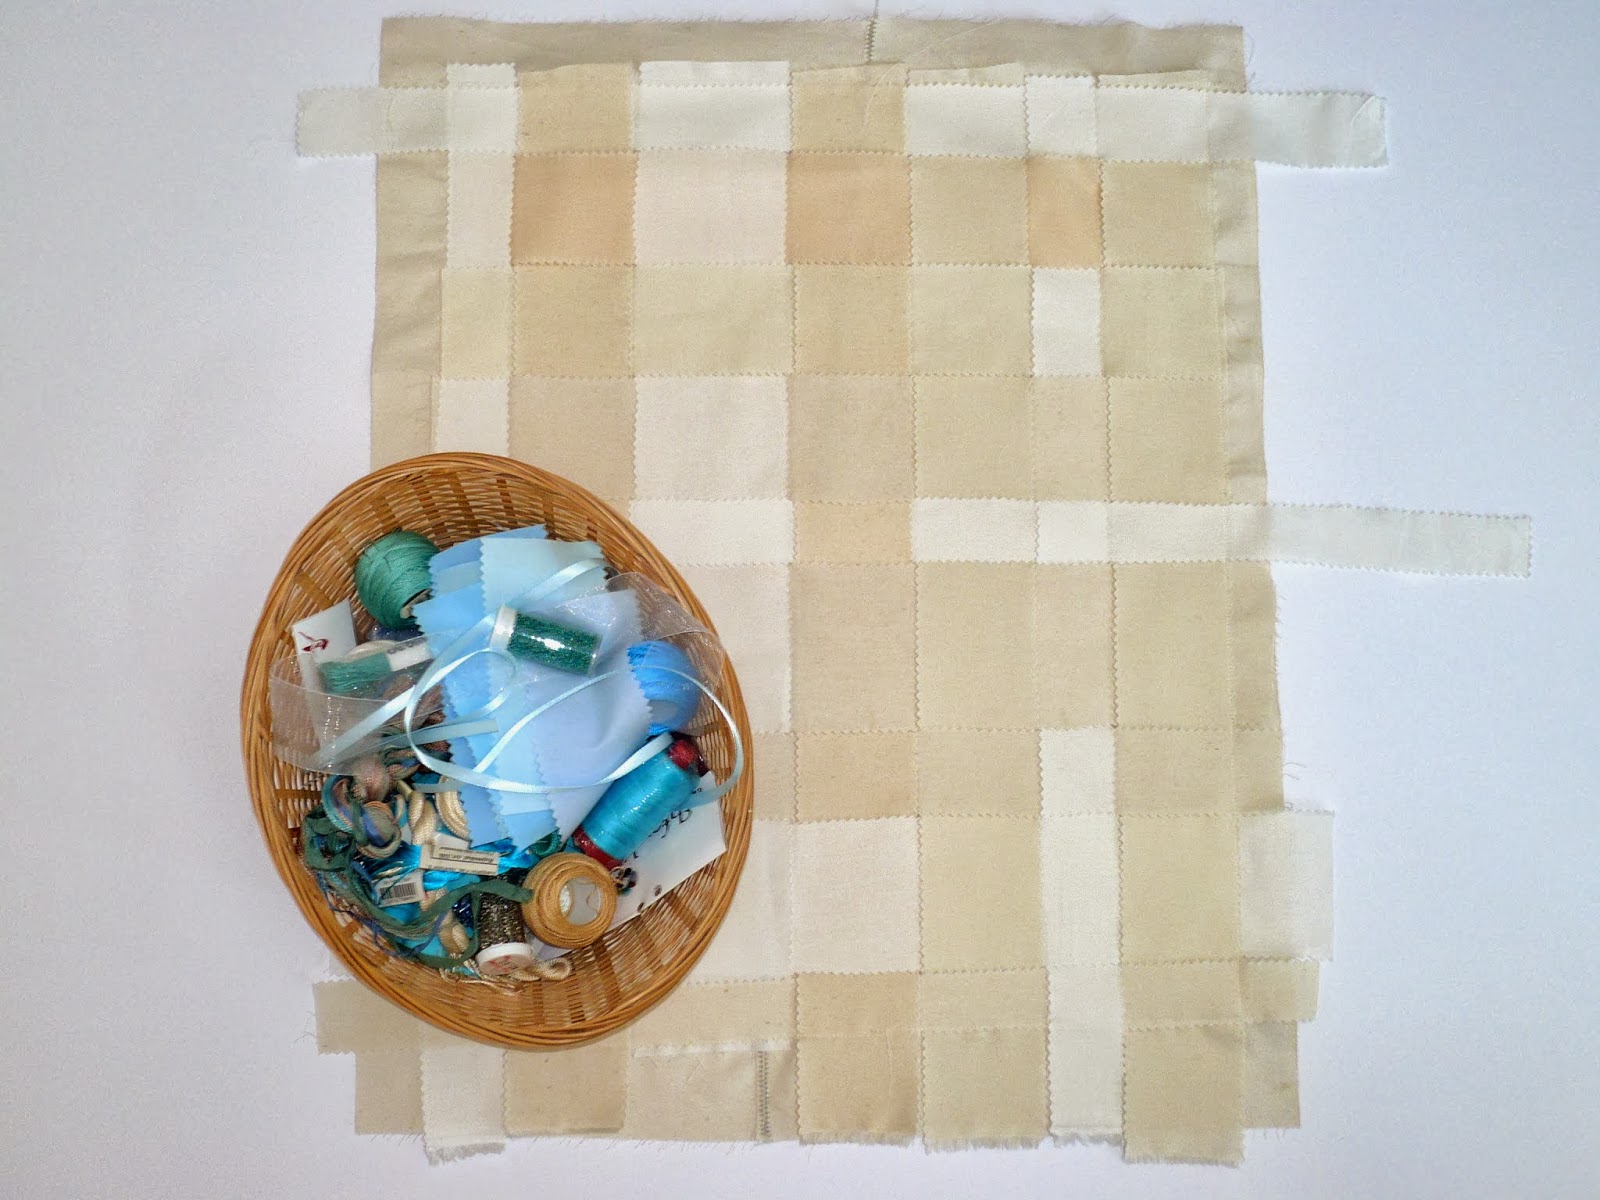

After careful consideration of some of my favourite pieces, I decided to start with a woven foundation of unfinished strips of bleached and unbleached muslin and cotton in various neutral shades.  This was a more subdued take on some of the multi-media woven pieces in the show.  I like subtle.

Another artist had worked a collection of simple hand embroidered squares.  These were mostly running stitches, but there were a few others used in smaller quantities.  Very subtle.

And, my third element was the colour - blue.  There was a lot of blue in the show including a collection of pieces made from faded and altered denim, a pair of multi-media assemblage works incorporating an amazing range of blue textiles, and a string of beautiful prayer flags representing the sky and water.  Beautifully subtle.

My imposed element was ... wait for it... bling.    glitter.  beads.  Anything shiny and textural.  For someone else, this wouldn't be a big deal, but it is for me.  I don't do bling.  I do subtle.  And that was the point.  My friend thought that I needed to take a big step and start to move outside my comfort zone. I needed to start working with more dimension.  Needless to say, I retaliated with an equally uncomfortable challenge.

Since these were truly experimental projects using unfamiliar materials, we agreed that we would work from stash and rescued material where possible.  And that there would be no time limit.  The point was just to do it.  To try.

So, I tried.  While I thought about how to incorporate that final feature, I began to stitch simple circles in running stitch.  Initially, I didn't even use blue, just picking up the neutral background colours in various thread weights.

Then I started to add some blue circles.  I started to vary the stitches with a bit of stem and chain stitching.  Then, I decided I'd done enough pussy footing around and that I would embrace the challenge, and if it ended up in the back of my closet, so be it.

In the end, I used beads, sequins, and buttons.  I stitched over plastic rings and metal washers.  I used a variety of ribbons and mesh.  And I went to town with metallic threads of every weight.  Since this was an improvisation piece, and didn't undo anything.  If I didn't like something, I kept stitching until it worked.  For example, the pearl beads looked awkward and tacked on, and I really wasn't happy with them, but after stitching around them with ivory rayon (shiny) thread, they became integrated into the piece.

I probably could have continued this way for another 3 years, but I finally decided that it was finished--that I had learned what I needed to learn from it--and now it's time to move on.


Friday, 31 March 2017

March finishes

March has been a "process" month--lots of handwork on large items--so I don't have many finished items to record.

The first two are both functional and experimental.  There was a need for some cropped camis, so I thought I'd try my hand at drafting a simple pattern.  It was quite challenging considering that it is such a simple garment.  Still, it has to be comfortable, and that means not only getting the correct fit (the easy part), but also getting the elastic right.  I definitely need more practice working with elastic.

The white one uses a picot edge foldover elastic.  It initially fit well, and it looks quite pretty, but the elastic appears to have shrunk after washing, so it's now too tight under the arms and around the torso.  Alterations will be needed.  The beige one doesn't look so pretty, but it's much more comfortable to wear.  This one has a much firmer lingerie elastic encased within the folded edge of the fabric  It still fits very comfortably after washing.  They definitely look better on than they do laying flat.


My other finish is this dress for Keira.  It's made from Simplicity 2265.

I can't say that I was impressed with the pattern instructions.  This should have been a relatively easy dress to make, but the needlessly confusing constructions led to a lot of seam ripping and resewing.  Nor did it help when terminology changed midway through the pattern.  For example, at one point instructions began to refer to a 'slip', but after much re-reading of the pattern, it became evident that they had simply stopped referring to the lining as a lining and decided to call it a slip. It's not a slip, but if they wanted to call it one, they could at least have done it consistently. 

The dress is made from a lovely Valori Wells cotton from the Wrenly line, and it's lined with lawn.  The ribbon bow is removable (I sewed it to a brooch pin) so that it could come off for washing, or when not wanted. Under the bow, the bodice has a cute little tuck, so it looks pretty either way.  The petal sleeves are very pretty, as it the button-up back.  I sewed a strip of gathered tulle folded lengthwise (with the folded edge to the bottom of the lining and the stitching along the cut edge of the tulle) to the outside of the lining so that it was between the lining and the skirt.  This kept the poky cut edges from being scratchy against her legs, and gave the skirt poof while staying comfortable.

The dress turned out well, and she really likes it, so I guess it was worth the bother, but I wouldn't make this pattern again. 

Thursday, 2 March 2017

February wardrobe addition

I actually made this shirt last month, but then I forgot to record it

I signed up for the Craftsy class "Easy Fitting the Palmer/Pletsch Way: Shirts & Tops" taught by Pati Palmer and Melissa Watson, and this shirt was the result.


The pattern is M6750, and I chose view B, the 3/4 length sleeve option.  I omitted one of the front darts because I prefer a less fitted garment.


The class was excellent, and the pattern instructions were very clear.  I'm mostly happy with the fit, although I find that the back neck is just a bit too high.  If I were to make it again, I would remove about 1/2 an inch.  That's not likely to happen though, because I'm not really a big fan of button front shirts.  I wanted to learn how to do this just for the sake of it, and I'll wear it, and I don't really need two of them.  But, I have no doubt that I'll use what I learned in this class many times over.  I'd highly recommend it.


Tuesday, 31 January 2017

My version of a sweat shirt

I love the feel of sweatshirts, but I never wear them.  The banded crew neck, drop shoulders, oversized body and sleeves, and ribbing at the cuffs and hipline are all on my list of things to avoid. The only garment that I can think of that is less flattering than a sweatshirt is sweatpants. But when I came across this amazingly soft cotton/poly sweat shirting, I couldn't resist.  It's January after all, and anything soft, warm, and cozy is welcome.  So, here is my version of a sweatshirt that's casual and comfortable.


I chose Vogue 8925 because I loved the silhouette.  I opted for the shorter length and bracelet-length sleeves, and didn't add the decorative bands.  I wanted simple in keeping with the concept of a sweatshirt. 


What this pattern lacks, though, is pockets, so I inserted some between the princess and side seams.  This fabric is quite bulky, so the top-stitching on the princess seams ensures that the pocket seams stay flat. It also highlights the princess seaming which is nicely placed.


I cut a small in the shoulders and the entire front panel, and after doing a 1/2 inch forward shoulder adjustment and lowering the bust point by 1 inch, I graded out to a medium from mid-bust to hip on the side seams.  This worked just fine in lieu of  a full-bust adjustment.  And, I wasn't happy with just turning and stitching the neckline, so I added cotton twill tape for stability.  Some reviewers felt that the neckline was too wide, but I think that it's perfect.

All in all, I'm happy with how it fits and feels.  I think that I might try it again in a French terry. It's going to be winter for a while yet, and another cozy top wouldn't go amiss.

Monday, 30 January 2017

Warm and snuggly

That's the only way to describe the dressing gowns that I made for the girls--very warm and very snuggly.

I used the same pattern for both, Simplicity 1946, and it was very simple and straight forward.
 
I had originally thought that Elyse could make her own dressing gown, but changed my mind because the fabric presented some challenges.  I couldn't find a mid-weight terry towelling anywhere in town, so I decided to use bath towels.  These were heavier than I really wanted, but much better than the very thin towelling that was available. Definitely not the route to take if you want to keep the cost down, but I couldn't find another option.  (Of course, now that they are finished, every store is having a sale on bath towels.)  I'm going to keep my eyes open for some fabric suitable for a summer-weight garment, and let Elyse try her had with that.

Working with fabric this thick wasn't easy. Because of the weight of the fabric, and in an attempt to reduce bulk, I tried different methods for sewing the seams . And, because of the thickness, a walking foot was essential throughout.


For Elyse's I wanted to incorporate the decorative bands throughout (turned up cuffs and pocket tops as well as the bottom band), without having to worry about the different finishing needs of the two weaves.  I overlapped the seam allowances and stitched them with one of my sewing machine's overcast stitches. I couldn't use the special foot for this stitch because of the need to use the walking foot. This worked quite well, and made a nice flat seam which I then trimmed back to the stitching lines on both sides.  I also added extra rows of top stitches along the front bands.While it looks somewhat faded in the photo, it's really a very pretty shade of blue - one of her favourites.

The towels for Keira's didn't have the same decorative bands to deal with, so I used a regular seam,  finished each edge, and then stitched each side of the seam allowance flat on either side of the seam line.  Terry ravels aggressively, so no unfinished areas could be left exposed. I also wanted to use that pretty pink binding, and it turned out to be a bit (okay, a lot) more fiddly to do that than I had expected. The binding is actually woven as part of the towelling fabric rather than sewn on after.  Still, it looked nice when it was finished, and there are no thick bumpy spots at the seams, so it was worth the effort. Keira wasn't in a picture-taking mood, but she liked it enough that she continued to wear it even after she got dressed.


The finished garments turned out just fine.  They are comfortable, and I suspect that they'll be very durable.  I don't think that I'll be sewing with bath towels any time soon, though. Once (or in this case, twice) was enough.

Thursday, 19 January 2017

2016 recap


I think that it's time to start using this blog again, if only to keep track of what I have accomplished.  it appears that once I've finished a project, I forget that I ever made it--especially if it leaves the house.  I've tried to recall what I've made in the last year, but this is a pretty sketchy list.  If I have a photo, that helped to jog the memory, but I don't always take them.  I'll have to remedy that in the new year.


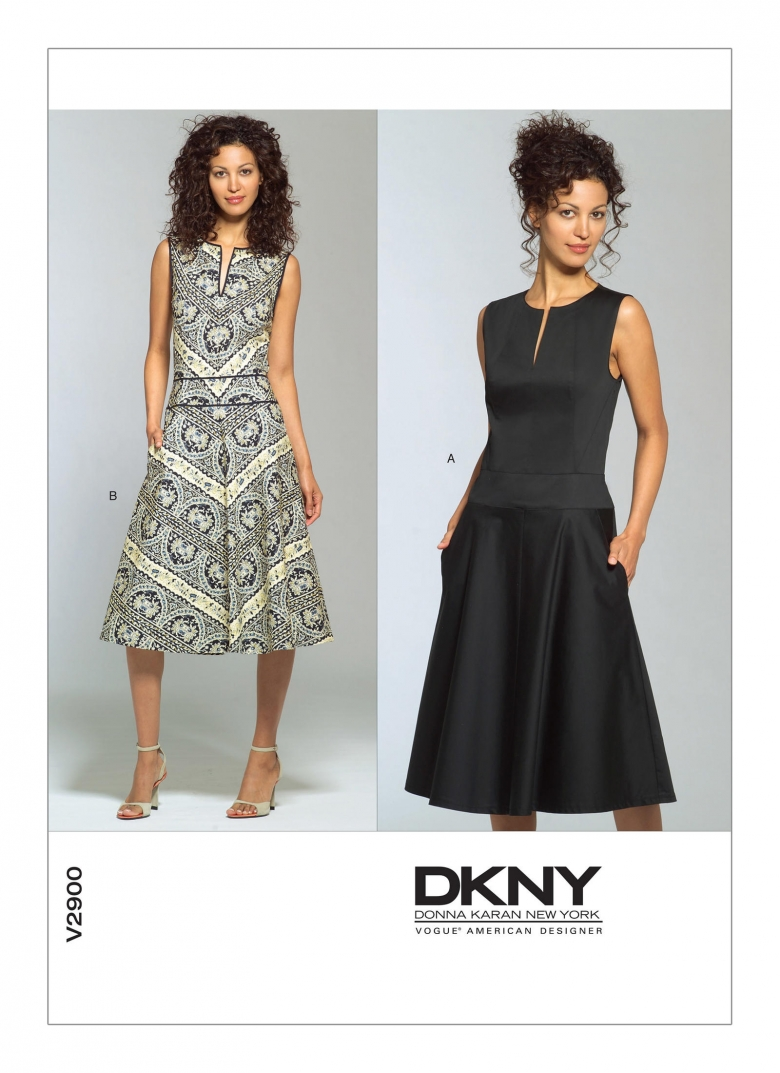
Vogue 2900 (out-of-print): A DKNY design made with Ralph Lauren fabric.  Not a success, but I wish that I had realized it sooner.  It looked fine at home, once I added the belt, but without shoes (it was a beach wedding), the proportions were completely wrong for me. No photo.  I may update this post when the weather warms up enough to put on a sleeveless dress.


Bahama Mama Tankini top and Boy shorts by Peek-a-boo patterns: I made two of these to take to Mexico for the wedding. They looked great dry,  but they drooped and sagged when wet. When I got home, I removed much of the lining, and without they extra weight, they're not as droopy.  I'm not sure that I'd post a photo of me in a bathing suit even if it were warm enough for me to take one


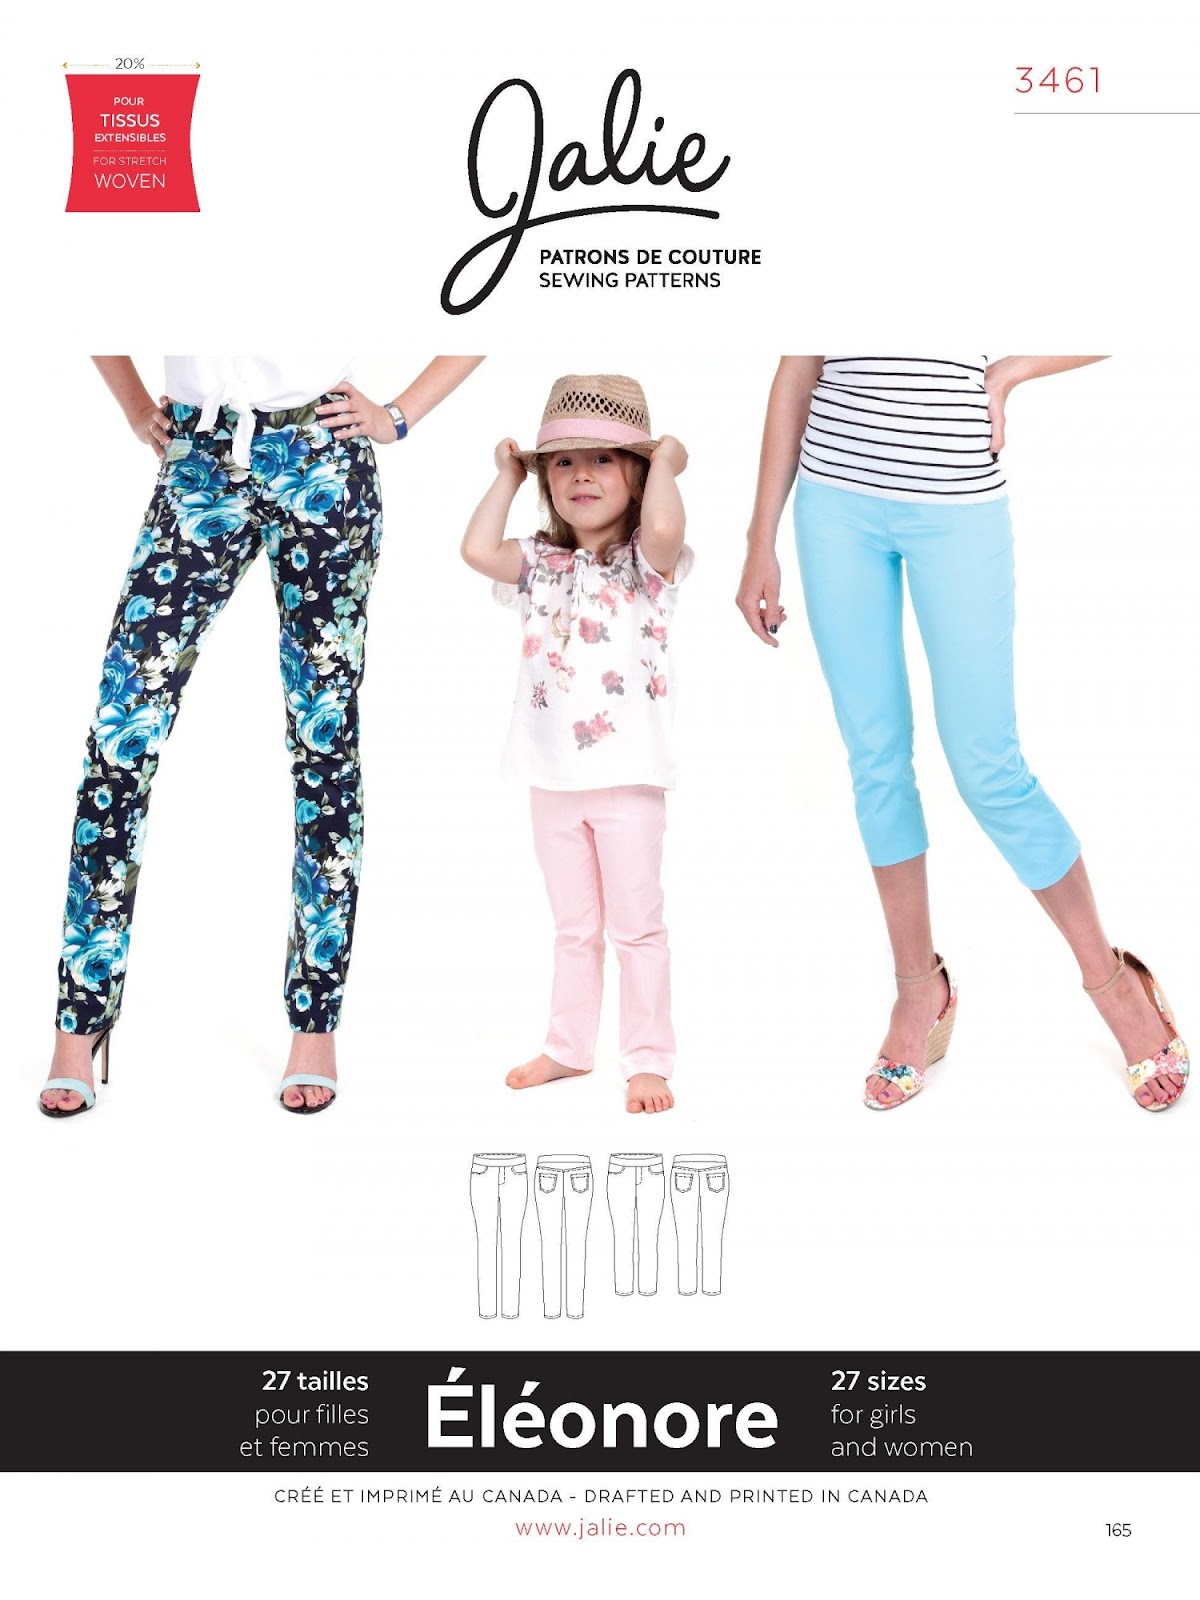
Jalie Eleonore Pull-on Jeans:   I made two pair of capri pants using this pattern.  One is used for gardening (it was my wearable muslin), and the other is wearable in public--just barely.  I liked the construction of these, but I'm struggling with the rise.  I may try it again, or I may just move on.
Jalie 3461 - Éléonore Pull-On Jeans


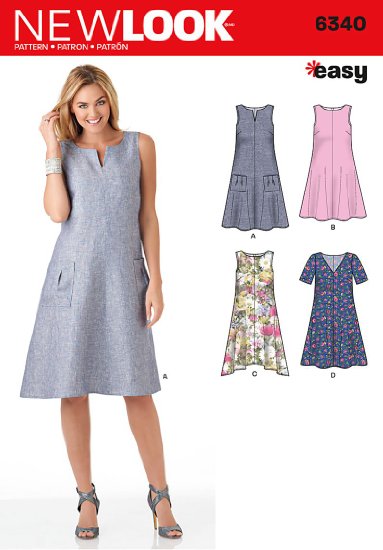
New Look 8340 (out-of-print) was next.  This was a beautiful linen print, but I think that it was wasted on this dress.  The upper body fit well, but I ended up taking out a full 18 inches at the hemline (tapering to nothing above the waist before it looked anything like the picture.   The pockets are pretty.

New Look 6340 Size A Misses' Easy Dresses Sewing Pattern, Multi-Colour


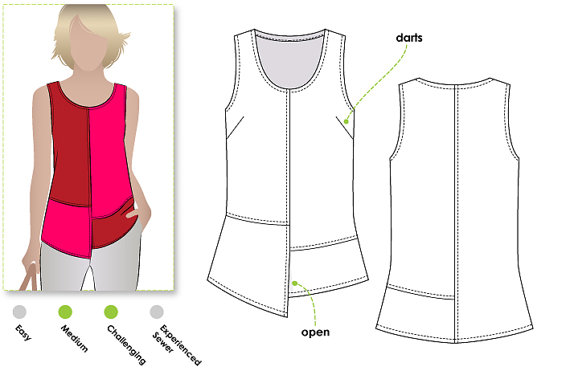
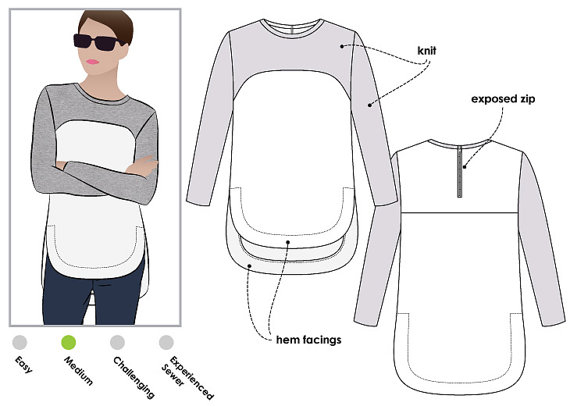
Style Arc Lexie:  I made this from a really pretty silk/cotton blend voile.  It needed serious modification to fit my vertical proportions--I mean, really--how can a person be both long-waisted, and petite?   At any rate, it fits perfectly.  The only change I would make would be to open the pleat (think wrap skirt) so that it doesn't bulge out when I sit.
Lexie Panel Top - Sizes 10, 12, 14 - Women's paneled pull-on top PDF Sewing Pattern by Style Arc - Sewing Project - Digital Pattern

I followed this with an upcycling project.  I had a black linen shirt that I couldn't bring myself to get rid of even though I never wore it.  The fabric was just too lovely.  The shirt made me look like a linebacker--not oversized, but way too boxy.  And, the crisp linen just made it worse.  I kept the front button band and the hem-although not the hemline - and moved the pocket from the breast to the hip.  I removed the collar and band, and made a more flattering round neckline.  I used the fabric from the sleeves to make the neck and armhole facings.  I love the slightly trapeze lines and the stepped hem.  It turned out to be more of a challenge than I had expected, but I love the final result, and I may try this again with a couple of other unworn pieces that I'm keeping just because I love the fabric. 
Style Arc Avery:  I made this entirely from knit fabric--cotton for the top and a cotton/poly blend for the bottom.  I faffed around quite a bit with this one, trying to make it fit in the upper chest.  I still haven't got it right, but the top is comfortable enough, and I wear it quite a bit.  I'll likely make it again, but go with the pattern recommendations to use a woven fabric for the bottom, or maybe a heavier ponte knit.  This mid-weight knit really doesn't hold it's shape at the hemline that well, and this shirt is all about that great hemline.
Avery Tunic Top Pattern - Sizes 10, 12, 14 - Women's PDF Top Sewing Pattern by Style Arc


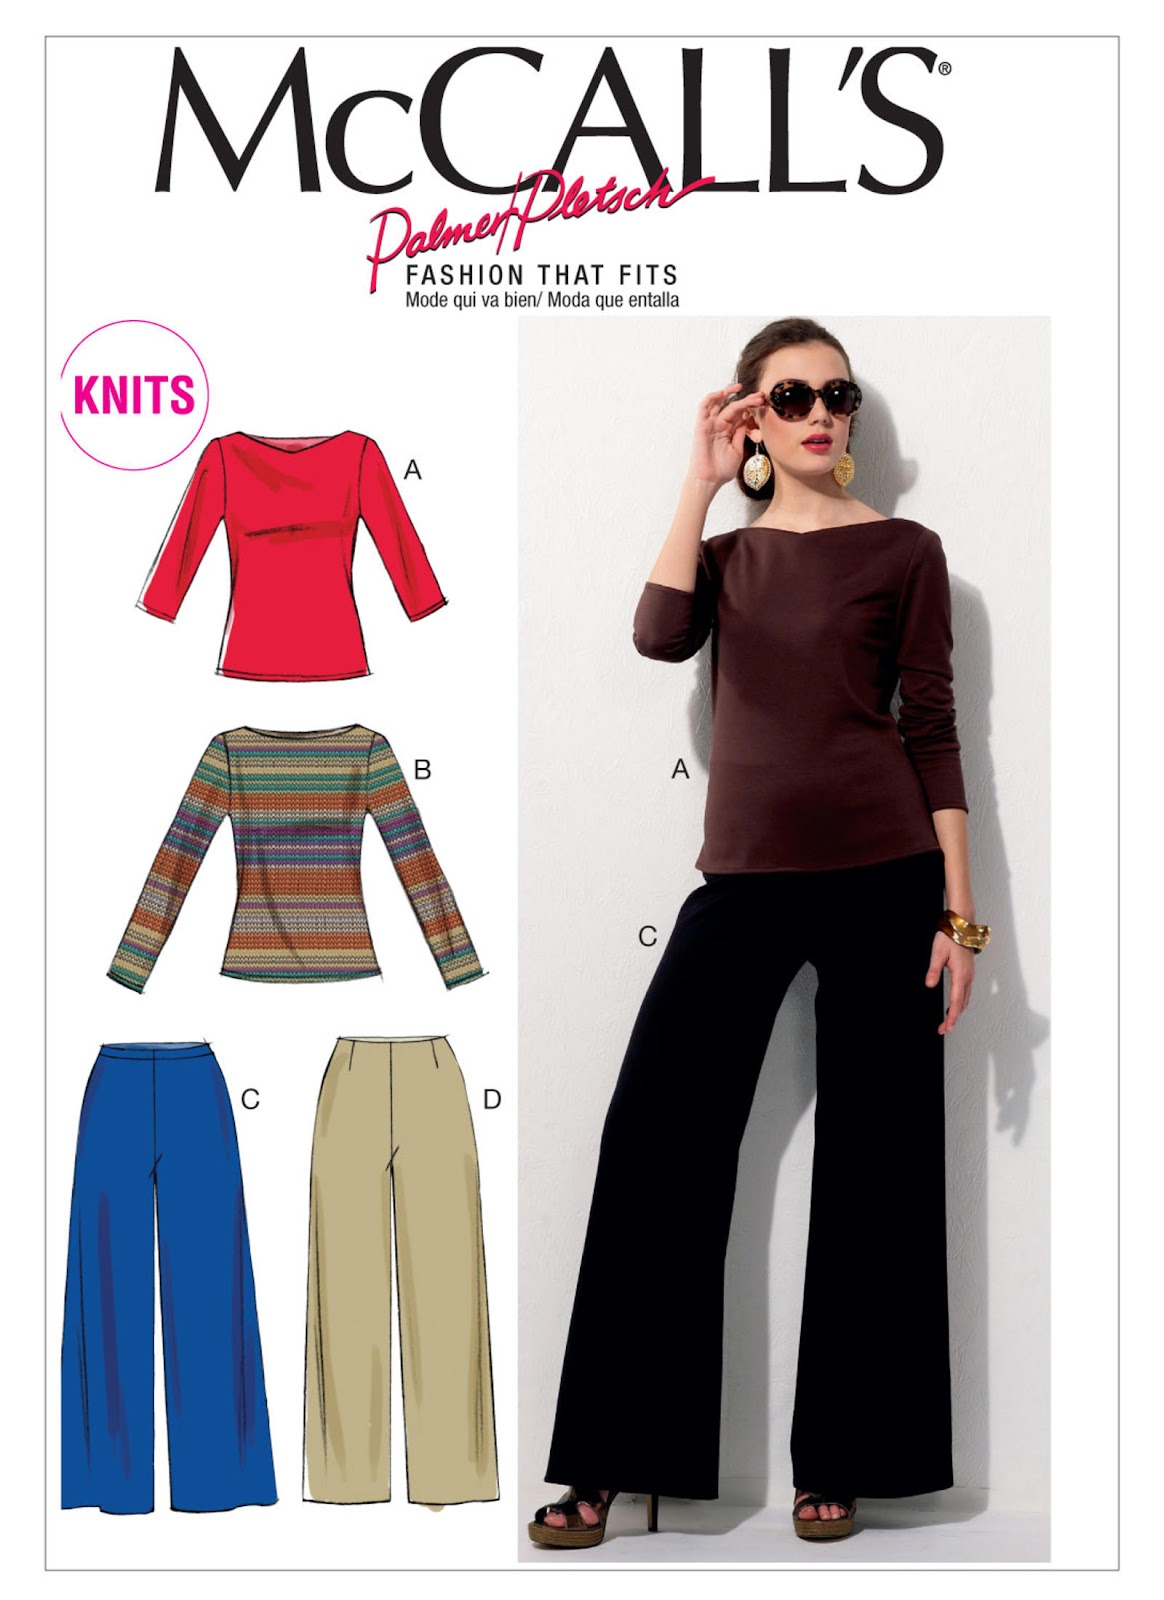
McCall's 6571:  I love this pattern!  I've made two tops so far, and they both fit perfectly.  I made them after watching their Craftsy class on fitting knits, so that was a big help.  Essentially, I need to use a smaller size, then make a full bust adjustment.  (No, I don't have a full bust, but I do have an oddly shaped rib-cage.)  This is much easier than trying to make the shoulders and upper chest smaller.


McCall's 6785: I made view D with a cowl neckline and side gathers for Elyse using an embossed poly velvet. I added long push-up cuffs to extend the life of the tunic, and to echo the collar. Here she's wearing it at its maximum length.
M6785, Children's/Girls' Dresses and Leggings


McCall's 6947:  I frankenpatterned this for Keira and used the same fabric as I did for Elye's tunic.  In this case, I made view C, added long sleeves, pockets (view B), and a ruffle (view E). The weight of the fabric gives it a great twirl factor!


And that is all that I can remember.  I know that I made more clothing for the girls, but I just don't remember exactly what I made. 

I also made a few accessories.  First a simple silk chiffon infinity scarf.  I made a couple more silk chiffon scarves, but I think that I gave them away.


Then, I decided that it was time to start knitting again.  This was a simple black garter stitch.  More challenging than it looks, but - black.  And, really long. It wraps around at least three times. And, it's quite wide. But, it's really warm, which we've needed the last couple of weeks, and I love the button.


While we were in New Zealand, I knit another scarf/shawl. The weather was miserable, so I had lots of time to work on it.


It's quite large, and knit with a lace weight alpaca.


And, the last thing that I can remember making was a needlepoint cushion cover that used up much less leftover needlepoint yarn than I had hoped. This took quite a while.  I think that I started it in 2013.


And, that about wraps it up.  If I think of anything else, I'll come back and edit this post.  Now, it's time to move on to this year's activities.  I'm going to make more of an effort to keep up to date, because it really was difficult to remember a year's worth of projects.  Fingers crossed.


Wednesday, 18 March 2015

One cushion cover completed!

But, I can't really count it toward my finish along list, because I wasn't the one who finished it.  Elyse has decided that she wants a rainbow of cushions on her bed, and has taken the first step with this gorgeous red QAYG cushion.

 She was incredibly focused as she selected, attached, and quilted each strip.  She even sewed in the zipper!


I just love that little selvedge strip.

Maybe, once she's finished her rainbow, I'll be able to talk her into making covers for the rest of my cushions.


Monday, 16 March 2015

Finished this before it's too warm to wear it.

This baby alpaca cowl is so incredibly soft and warm.  I just wish I could get the colours in my photos to be a deep and rich as it is in real life. 


The seed stitch adds a lovely texture, and I actually managed to graft the ends together in seed stitch, so the join is virtually invisible.  Other than the grafting, it must be one of the easiest knitting projects ever undertaken.  It's pretty difficult to make a mistake with seed stitch, and if you do, it's immediately noticeable.


Wednesday, 11 February 2015

WIP Wednesday

I've decided that it's time that I started posting more in progress work in order to remind myself that I'm still making progress even if it's so slow as to be barely noticeable.  Or, as in the case of today's post, several steps backwards.

The short story is that I decided to make a duvet cover.  I prefer the aesthetics of a quilt, but in winter, the light weight warmth of a duvet is essential.  As a compromise, a pieced duvet cover seemed to be in order.  So, I took several stacks of charms and turned them into a very pretty hst quilt top.  But, without a backing and batting and quilting, how was I to keep the unfinished seams on the back from fraying in the wash?  Simple, I thought.  I'd just do some faux quilting that would seal in those seams.  I tested a few of the quilting stitched on my machine and finally decided on this serpentine stitch. Voila!


The problem is that it looks much nicer in the photo than it does in person where it puckers and looks and feels very stiff.  The vertical stitching looked fine, and the horizontal rows looked okayish.  But when I started on the diagonal lines, I decided that I just couldn't live with it.  The intersecting seams are the worst, and they're also the most difficult to pick out. 
 

Yes, I'm taking out all that I've done.  Fortunately, the top was divided in thirds, so it could have been a lot worse.  I've finished the first column--only five more to go. Then, it's on to plan B. 

Linking up with Lee:


Tuesday, 27 January 2015

Coming along swimmingly


Okay, it's a lame title, but I'm sticking with it.  It somehow seems fitting since my first finish of 2015 is a swim suit. Yes, I finished Elyse's much needed swim suit, and it actually fits her  and looks very nice on her.  Even in bad lighting.


As I mentioned in my FAL first quarter goal list, this was a challenging project, but I'm so glad that I did it.   One of the main things I learned while making the suit is not to overlook the value of hand-stitching/basting.  For example, trying to stitch those tiny cups together was an exercise in futility until I decided to treat them like a bit of English paper piecing.  Then it took about 90 seconds. 

Since this was my first attempt at sewing this type of fabric, I only made one change to the pattern, and that was to fully line the bottoms since light-coloured fabrics have a tendency to become transparent when wet. 

And, now that I've made one project with this super stretchy, slippery fabric, I won't be afraid to tackle another.  Maybe even one for myself, though I won't be modelling it for any pictures.


2015 FAL at On the Windy Side

Tuesday, 13 January 2015

First quarter goals for a new year

To say that my accomplishments in 2014 were less than stellar would be an understatement.  Two quilts, a bit of sewing and knitting for the girls and even less for myself.  (On the upside, I listened to a remarkable number of audiobooks, so the year wasn't a total write-off.) This makes assembling my first quarter goal list pretty straight forward--I just have to cut and paste from previous lists.

Number 1 was on my 2014 fourth quarter list (and in the interests of full disclosure, the fourth quarter 2013 list as well).  It's the beautiful Oh My Stars! designed by Sheila at Thought and Found. I'm determined that I will finish this.

Number 2, that I'm calling my Snow Geese quilt was also on last quarter's list.  I haven't touched it either.


And, for number 3, there are the cushion covers of shame, also a carry forward.


Number 4 is a carry forward from 2013, that I've been working on slowly but steadily.  It's about twice the size that it was the last time I listed it as a goal, and I think that there's a good chance that I'll be able to finish this one in the next couple of months. 


I do have a couple of new projects, though.

Elyse's bathing suit has succumbed to chlorine and she needs a new one, but  mid-winter isn't a good time to buy child's swimwear in Canada.  Ergo, I'm making her one.  I've never done this before.  The knit fabric is very stretchy, it has a knit lining, the pieces are small, and she wants me to make changes to the pattern.  It's challenging.  I think that the trick here will be to keep saying I think I can, I think I can...and to focus on the fact that she really needs it.


And, since it is still winter, I'd really like to finish this Ramona cowl in time to wear it this season.  I've finished one full repeat, and there are only nine more to go.  Yes, it's inside out.  That's how I knit stranded colour work.


There are many other projects that need to be finished up (not to mention the new ones I'll start-Kid's Clothes Week is coming up soon), but since I've clearly placed myself in the wishful thinking category already, I'll leave it at that.

Linking up to Adrianne, our new taskmaster for 2015.  Welcome, Adrianne, and thank you for taking this on.


2015 FAL at On the Windy Side